こちらは「pyexr」(Pythonライブラリ)のサンプルコードについての記事となっております。
目次
基本情報 … Basic Information
pyexrは、EXRファイルを読み書きするためのPythonライブラリです。EXRファイルは、HDR画像を保存するための高度な画像フォーマットで、光の動きや色の微細な変化を含む広範なダイナミックレンジをサポートしています。pyexrは、PythonのNumPy配列としてEXR画像を読み込み、NumPy配列をEXRファイルとして書き込むことができます。また、pyexrには、画像処理のための機能も用意されています。
サンプルコード … Sample Code
001 画像の読み込み, 画像の表示, 画像の書き込み, 画像の保存 … Read the Image, Show the Image, Save/Write the Image
1.「pyexr」(Pythonライブラリ)で「EXR」ファイルを読み込む
2.「matplotlib」(Pythonライブラリ)で「EXR」画像を表示する
3.「pyexr」(Pythonライブラリ)で「EXR」ファイルを書き込む
###############################################################################

import pyexr
import matplotlib.pyplot as plt

###############################################################################

img = pyexr.open("SAMPLE/monkey.exr")

print(img)      ### <pyexr.exr.InputFile object at 0x00000180B80DE780>

print(img.width)          ### Image Width:  1080
print(img.height)         ### Image Height: 1080
print(img.depth)          ### Image Channel (Num):  4
print(img.channels)       ### Image Channel (Info): ['R', 'G', 'B', 'A']

print(img.precisions)                 ### Image Pixel Value Precision [R/G/B/A]:    [FLOAT, FLOAT, FLOAT, FLOAT]
print(img.channel_precision["R"])     ### Image Pixel Value Precision [R]:          FLOAT
print(img.channel_precision["G"])     ### Image Pixel Value Precision [G]:          FLOAT
print(img.channel_precision["B"])     ### Image Pixel Value Precision [B]:          FLOAT
print(img.channel_precision["A"])     ### Image Pixel Value Precision [A]:          FLOAT

print(img.input_file)                 ### InputFile represented
print(img.root_channels)              ### {'default'}
print(img.channel_map)
### defaultdict(<class 'list'>, {'all': ['R', 'G', 'B', 'A'], 'default': ['R', 'G', 'B', 'A'], 'R': ['R'], 'G': ['G'], 'B': ['B'], 'A': ['A']})

### Numpy Array Information by Channels
ndarr_1      = img.get(precision=pyexr.FLOAT)    ### FLOAT
ndarr_2      = img.get(precision=pyexr.HALF)     ### HALF

print(type(ndarr_1))    ### <class 'numpy.ndarray'>
print(ndarr_1.dtype)    ### float32
print(ndarr_1.size)     ### 4665600
print(ndarr_1.shape)    ### (1080, 1080, 4)
print(ndarr_1[0,0])     ### [0.9512654 0.9512654 0.9512654 1.       ]

print(type(ndarr_2))    ### <class 'numpy.ndarray'>
print(ndarr_2.dtype)    ### float16
print(ndarr_2.size)     ### 4665600
print(ndarr_2.shape)    ### (1080, 1080, 4)
print(ndarr_2[0,0])     ### [0.951 0.951 0.951 1.   ]

### Numpy Array Information by Channel
ndarr_1_R    = img.get("R", precision=pyexr.FLOAT)
ndarr_1_G    = img.get("G", precision=pyexr.FLOAT)
ndarr_1_B    = img.get("B", precision=pyexr.FLOAT)

ndarr_2_R    = img.get("R", precision=pyexr.HALF)
ndarr_2_G    = img.get("G", precision=pyexr.HALF)
ndarr_2_B    = img.get("B", precision=pyexr.HALF)

###############################################################################

### Matplotlib Show Image
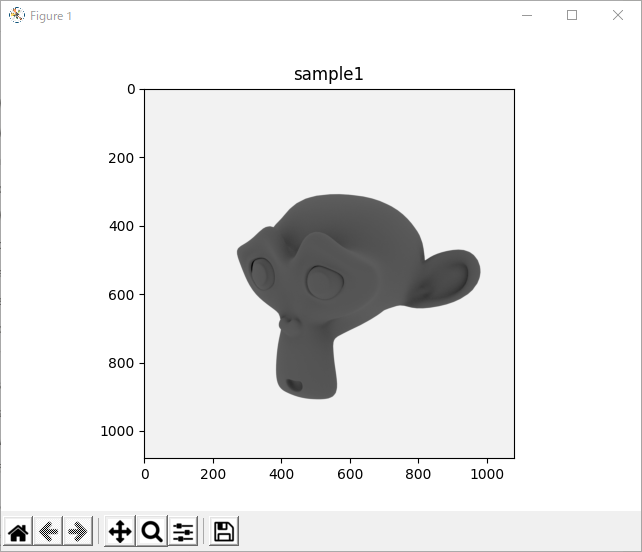
plt.imshow(ndarr_1)
plt.title('sample1')
plt.show()

###############################################################################

### PyEXR Save Image
pyexr.write("SAMPLE/pyexr001.exr", ndarr_1, precision=pyexr.FLOAT)
pyexr.write("SAMPLE/pyexr002.exr", ndarr_2, precision=pyexr.HALF)

###############################################################################上記のPythonプログラムは、Pythonモジュール「PyEXR」を使用して、EXR形式の画像ファイルから情報を取得し、Matplotlibを使用して画像を表示する方法を示しています。 このプログラムには、画像のサイズやピクセル値の精度など、さまざまな情報を出力するコードが含まれています。
まず、PyEXRモジュールをインポートし、指定された画像ファイルを開きます。 次に、画像のサイズとチャンネル数、各チャンネルの精度など、さまざまな情報を出力します。 その後、Numpy配列を使用して、画像内のピクセル値を取得します。 最後に、Matplotlibを使用して、画像を表示します。
サンプル出力画像1

