こちらは「pillow」(Pythonライブラリ)のサンプルコードについての記事となっております。
目次
- 基本情報 … Basic Information
- 「pillow」をセットアップする方法 … How to Setup pillow
- サンプルコード … Sample Code
- 001 画像の読み込み, 画像情報の表示 … Read the Image and Get Information from the Image
- 002 画像の読み込み, 画像の表示, … Read the Image, Show the Image
- 003 画像の読み込み, 画像の書き出し, 画像の保存 … Read and Save the Image
- 004 データの生成 … Create the Image
- 005 円の描画 … Draw a Circle on the Image
- 006 文字の描画 … Write a Text/Word on the Image
- 007 線の描画 … Draw a Line on the Image
- 008 長方形の描画 … Draw a Rectangle on the Image
- 参考リンク … Reference Link
基本情報 … Basic Information
Pythonライブラリの「pillow」は、画像処理のための機能を提供するライブラリです。画像の読み込み、書き出し、変換、合成、リサイズ、回転など、多様な画像処理に対応しています。
「pillow」は、Python標準ライブラリの「PIL (Python Imaging Library)」のフォークであり、PILよりも新しいバージョンで、Python 3にも対応しています。
また、「pillow」は、画像フォーマットとしてJPEG、PNG、BMP、GIF、TIFFなど、主要な画像フォーマットに対応しています。
インストール方法(pip)
>>> pip install Pillowインストール方法(conda)
>>> conda install -c anaconda pillow「pillow」をセットアップする方法 … How to Setup pillow
検証環境
・Python:3.6.13
・Pillow:8.4.0
・Anaconda:2022.10
・Visual Studio Code: 1.48.2
手順
>>> pip install Pillow==8.4.0サンプルコード … Sample Code
001 画像の読み込み, 画像情報の表示 … Read the Image and Get Information from the Image
from PIL import Image

def main():

    # 変数の定義
    input_path = 'SAMPLE/monkey.png'

    # 画像の読み込み
    try:
        with Image.open(input_path) as image:
            # 画像情報の表示
            print(f'image:\n{image}')
            print(f'type:\n{type(image)}')
            print(f'filename:\n{image.filename}')
            print(f'mode: {image.mode}')
            print(f'size: {image.size}')
            print(f'width: {image.width}')
            print(f'height: {image.height}')
            print(f'format: {image.format}')
            print(f'min, max: {image.getextrema()}')
            print(f'information:\n{image.info}')

    except FileNotFoundError:
        print(f'Failed to load image from {input_path}')
    except IOError:
        print(f'Failed to open image {input_path}')

if __name__ == '__main__':
main()上記のPythonプログラムは、Pillowライブラリを使用して画像を読み込み、画像情報を表示し、画像を表示する方法を示しています。
まず、プログラムはPillowライブラリからImageをインポートします。次に、プログラムはmain()関数を定義します。この関数では、input_pathという変数を定義し、読み込む画像のファイルパスを指定します。
with Image.open(input_path) as image:というコードで、指定されたファイルパスから画像を読み込みます。withブロックを使用することで、画像が自動的に閉じられることを保証します。
次に、プログラムはimageオブジェクトの属性を表示します。たとえば、filename属性は画像のファイル名を、mode属性は画像のカラーモードを、size属性は画像の幅と高さを表します。また、getextrema()メソッドを使用することで、画像のピクセル値の最小値と最大値を取得することができます。
情報の表示
image:
<PIL.PngImagePlugin.PngImageFile image mode=RGBA size=1080×1080 at 0x26571BE06A0>
type:
<class ‘PIL.PngImagePugin.PngImageFile’>
filename:
SAMPLE/monkey.png
mode: RGBA
size: (1080, 1080)
width: 1080
height: 1080
format: PNG
min, max: ((0, 205), (0, 205), (0, 205), (255, 255))
information:
{
‘dpi’: (72.009, 72.009),
‘File’: ‘C:\\sample.blend’,
‘Date’: ‘2022/01/01 00:00:00’,
‘Time’: ’00:00:00:01′,
‘Frame’: ‘001’,
‘Camera’: ‘Camera’,
‘Scene’: ‘Scene’,
‘RenderTime’: ’00:00.01′,
‘cycles.View Layer.samples’: ‘128’,
‘cycles.View Layer.total_time’: ’00:00.01′,
‘cycles.View Layer.render_time’: ’00:00.01′,
‘cycles.View Layer.synchronization_time’: ’00:00.01′
}
002 画像の読み込み, 画像の表示, … Read the Image, Show the Image
from PIL import Image

def main():

    # 変数の定義
    input_path = 'SAMPLE/monkey.png'

    # 画像の読み込み
    try:
        with Image.open(input_path) as image:
            # 画像の表示
            image.show()
    except FileNotFoundError:
        print(f'Failed to load image from {input_path}')
    except IOError:
        print(f'Failed to open image {input_path}')

if __name__ == '__main__':
main()上記のプログラムは、PythonのPillowライブラリを使用して、指定されたパスにある画像を読み込み、表示するプログラムです。
from PIL import ImageでPillowライブラリからImageをインポートしています。
input_pathは、読み込む画像ファイルのパスを定義する変数です。
with Image.open(input_path) as image:を使用して、指定されたパスにある画像を開き、imageに格納しています。
最後に、image.show()を使用して、読み込んだ画像を表示しています。
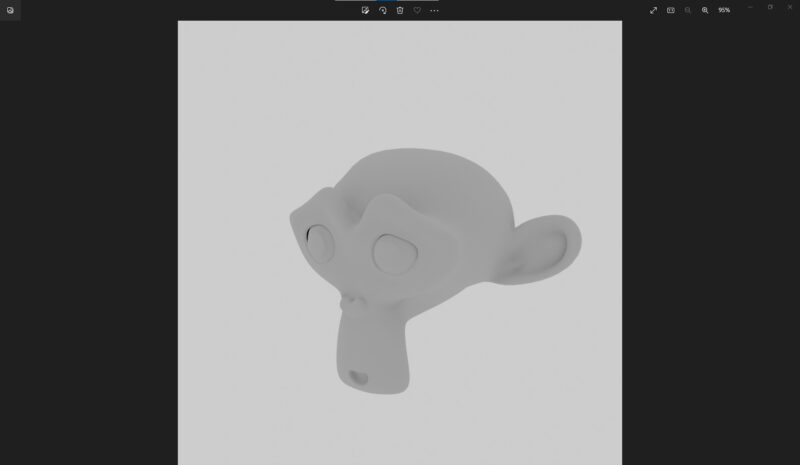
画像の表示
003 画像の読み込み, 画像の書き出し, 画像の保存 … Read and Save the Image
from PIL import Image

def main():
    # 変数の定義
    input_path = "SAMPLE/monkey.png"
    output_path = "SAMPLE/monkeyCopy.png"

    # 画像の読み込み
    try:
        image = Image.open(input_path)
    except IOError:
        print(f'Failed to load image from {input_path}')
        return

    # 画像の書き出し, 画像の保存
    image.save(output_path)
    print(f"Saved image to {output_path}")

if name == 'main':
main()このPythonプログラムは、PILライブラリを使用して画像を読み込み、コピーする方法を示しています。
まず、Imageモジュールをインポートします。main()関数では、入力ファイルパスと出力ファイルパスを定義します。次に、try-exceptブロックを使用して、指定された入力ファイルパスから画像を読み込みます。画像が正常に読み込まれなかった場合、エラーメッセージが表示されます。
画像が正常に読み込まれた場合、save()メソッドを使用して出力ファイルパスに画像を保存します。最後に、保存されたファイルパスが表示されます。
004 データの生成 … Create the Image
from PIL import Image

def show_save_image(image, title, file_path):
    # PIL Imageを表示
    image.show(title)
    # PIL Imageを保存
    image.save(file_path)

def main():
    # 変数の定義
    output_path_white = "SAMPLE/whiteImage.png"
    output_path_black = "SAMPLE/blackImage.png"
    output_path_blue = "SAMPLE/blueImage.png"
    output_path_green = "SAMPLE/greenImage.png"
    output_path_red = "SAMPLE/redImage.png"

    # 画像となるデータを生成する
    width, height = 400, 400
    white = (255, 255, 255)
    black = (0, 0, 0)
    blue = (0, 0, 255)
    green = (0, 255, 0)
    red = (255, 0, 0)

    # それぞれのカラーの画像を生成し、表示と保存
    image = Image.new('RGB', (width, height), color=white)
    show_save_image(image, 'White Image', output_path_white)

    image = Image.new('RGB', (width, height), color=black)
    show_save_image(image, 'Black Image', output_path_black)

    image = Image.new('RGB', (width, height), color=blue)
    show_save_image(image, 'Blue Image', output_path_blue)

    image = Image.new('RGB', (width, height), color=green)
    show_save_image(image, 'Green Image', output_path_green)

    image = Image.new('RGB', (width, height), color=red)
    show_save_image(image, 'Red Image', output_path_red)

if __name__ == '__main__':
main()このプログラムでは、PIL Imageを表示するためにshow_save_image関数を使用しています。この関数は、画像と表示するタイトルを受け取り、画像を表示し、指定されたファイルパスに画像を保存します。それぞれの画像は、Image.new()関数を使用して生成され、背景色が指定されています。
このプログラムを実行すると、5つの異なる色の画像が生成され、それぞれの画像が表示され、保存されます。これは、Pythonで簡単に色付きの画像を生成する方法の例です。
005 円の描画 … Draw a Circle on the Image
from PIL import Image, ImageDraw

def main():
    # 変数の定義
    input_path = "SAMPLE/monkey.png"
    output_path = "SAMPLE/monkeyWithCircle.png"

    # 画像の読み込み
    image = Image.open(input_path)

    # 画像が読み込めなかった場合の例外処理
    if image is None:
        print(f'Failed to load image from {input_path}')
        return

    # ImageDrawオブジェクトの生成
    draw = ImageDraw.Draw(image)

    # 画像上に円の描画
    draw.ellipse((10, 10, 90, 90), outline=(0, 255, 0), width=2)
    draw.ellipse((70, 70, 230, 230), outline=(255, 255, 0), width=6)
    draw.ellipse((150, 150, 250, 250), fill=(0, 255, 255))

    # 画像の保存
    image.save(output_path)
    print(f"Saved image to {output_path}")

if __name__ == '__main__':
main()上記のPythonプログラムは、画像に円を描画する方法を示しています。このプログラムでは、PIL(Python Imaging Library)のImageとImageDrawモジュールを使用しています。以下は、このプログラムの概要です。
- 必要なライブラリをインポートします。
- 入力ファイルパス、出力ファイルパスを定義します。
- PILのImageモジュールを使用して、入力画像を読み込みます。
- ImageDrawオブジェクトを生成します。
- ImageDrawオブジェクトを使用して、画像上に円を描画します。
- 画像を保存します。
上記のプログラムを実行すると、入力画像の指定された場所に3つの円が描画された新しい画像が出力されます。
006 文字の描画 … Write a Text/Word on the Image
from PIL import Image, ImageDraw, ImageFont

def main():

    # 変数の定義
    input_path = "SAMPLE/monkey.png"
    output_path = "SAMPLE/monkeyWithText.png"

    # 画像の読み込み
    image = Image.open(input_path)

    # 画像が読み込めなかった場合の例外処理
    if image is None:
        print(f'Failed to load image from {input_path}')
        return

    # 画像上に文字の描画
    draw = ImageDraw.Draw(image)
    font = ImageFont.truetype("arial.ttf", 32)
    draw.text((50, 50), "Python, Pillow", fill=(50, 60, 80), font=font)

    # 画像の保存
    image.save(output_path)
    print(f"Saved image to {output_path}")

    # 画像の表示
    image.show()

if __name__ == '__main__':
main()このプログラムでは、まず画像を読み込み、その上に文字を描画しています。画像に文字を描画するには、ImageDraw.DrawオブジェクトとImageFontオブジェクトを使います。最後に、画像を保存し、表示します。
このプログラムを実行すると、指定された画像(例えば、”SAMPLE/monkey.png”)に「Python, Pillow」という文字列が追加された画像(例えば、”SAMPLE/monkeyWithText.png”)が生成されます。
007 線の描画 … Draw a Line on the Image
from PIL import Image, ImageDraw

def main():

    # 変数の定義
    input_path = "SAMPLE/monkey.png"
    output_path = "SAMPLE/monkeyWithLine.png"

    # 画像の読み込み
    image = Image.open(input_path)

    # 画像が読み込めなかった場合の例外処理
    if image is None:
        print(f'Failed to load image from {input_path}')
        return

    # 画像上に線の描画
    draw = ImageDraw.Draw(image)
    draw.line((50, 50, 200, 50), fill=(255, 0, 0))
    draw.line((50, 100, 200, 100), fill=(0, 255, 0), width=5)

    # 画像の保存
    image.save(output_path)
    print(f"Saved image to {output_path}")

    # 画像の表示
    image.show()

if __name__ == '__main__':
main()Pythonの画像処理ライブラリであるPillowを用いて、画像上に線を描画するプログラムの例です。
このプログラムでは、まず画像を読み込みます。次に、ImageDrawモジュールを使用して、draw.lineメソッドにより線を描画します。線の開始位置と終了位置を指定し、線の色や太さを設定することができます。最後に、描画した画像を保存し、表示します。
008 長方形の描画 … Draw a Rectangle on the Image
from PIL import Image, ImageDraw

def main():

    # 変数の定義
    input_path = "SAMPLE/monkey.png"
    output_path = "SAMPLE/monkeyWithRectangle.png"

    # 画像の読み込み
    image = Image.open(input_path)

    # 画像が読み込めなかった場合の例外処理
    if image is None:
        print(f'Failed to load image from {input_path}')
        return

    # 描画用のオブジェクトを生成
    draw = ImageDraw.Draw(image)

    # 長方形の描画
    draw.rectangle([(50, 150), (125, 250)], outline=(0, 255, 0), width=2)
    draw.rectangle([(150, 300), (300, 500)], outline=(255, 255, 0), width=6)
    draw.rectangle([(350, 600), (575, 900)], fill=(0, 255, 255))

    # 画像の書き出し, 画像の保存
    image.save(output_path)
    print(f"Saved image to {output_path}")

    # 画像の表示
    image.show()

if __name__ == '__main__':
main()上記のPythonスクリプトは、画像処理ライブラリのPillowを使用して、緑色、黄色、シアン色の長方形を画像の上に描画するサンプルです。
スクリプトは、画像を読み込み、描画用のオブジェクトを生成します。その後、 draw.rectangleメソッドを使用して、3つの長方形を描画します。最後に、画像を保存し、表示します。
参考リンク … Reference Link