こちらは「opencv」(Pythonライブラリ)のサンプルコードについての記事となっております。
目次
- 基本情報 … Basic Information
- 「opencv」をセットアップする方法 … How to Setup opencv
- サンプルコード … Sample Code
- 001 画像の読み込み, 画像情報の表示 … Read the Image and Get Information from the Image
- 002 画像の読み込み, 画像の表示 … Read and Show the Image
- 003 画像の読み込み, 画像の書き出し, 画像の保存 … Read and Save the Image
- 004 データの生成 … Create the Image
- 005 円の描画 … Draw a Circle on the Image
- 006 文字の描画 … Write a Text/Word on the Image
- 007 線の描画 … Draw a Line on the Image
- 008 長方形の描画 … Draw a Rectangle on the Image
- 009 画像の反転 … Flip the Image
- 010 画像の拡大/縮小 … Resize the Image
- 011 画像の回転 … Rotate the Image
- 012 画像の切り抜き/トリミング … Trim the Image
- 013 画像の読み込み(RGB→GRAY)… Read the Image as Gray Scale Image
- 014 画像の色変換(RGB→GRAY)… Convert the Image to Gray Scale Image
- 015 カラー画像の分離(R/G/B)… Split the Color Image by R/G/B
- 参考リンク … Reference Link
基本情報 … Basic Information
OpenCV(Open Source Computer Vision Library)は、画像や動画の処理や解析を行うためのオープンソースのコンピュータビジョンライブラリです。主にC++で開発されていますが、PythonやJava、MATLABなどの言語でも利用することができます。
OpenCVは、画像処理やコンピュータビジョンの分野で一般的に使用されるアルゴリズムやテクニックの実装を提供しています。例えば、画像のリサイズ、回転、トリミング、フィルタリング、特徴量抽出、物体検出、顔認識などの処理をサポートしています。
OpenCVは、コンピュータビジョンの分野での研究や開発において、広く利用されています。ビジョンベースの自動運転やロボティクス、セキュリティシステム、医療画像処理、顔認識技術などに使用されています。
インストール方法(pip)
>>> pip install opencv-pythonインストール方法(conda)
>>> conda install opencv「opencv」をセットアップする方法 … How to Setup opencv
検証環境
・Python:3.6.13
・numpy:1.19.5
・opencv-python:4.6.0.66
・Anaconda:2022.10
・Visual Studio Code: 1.48.2
手順
>>> pip install opencv-python==4.6.0.66サンプルコード … Sample Code
001 画像の読み込み, 画像情報の表示 … Read the Image and Get Information from the Image
import cv2

def main():

    # 変数の定義
    input_path = 'SAMPLE/monkey.png'

    # 画像の読み込み
    image = cv2.imread(input_path)

    # 画像が読み込めなかった場合の例外処理
    if image is None:
        print(f'Failed to load image from {input_path}')
        return

    # 画像情報の表示
    print(f'data:\n{image}')
    print(f'type: {type(image)}')
    print(f'dtype: {image.dtype}')
    print(f'size: {image.size}')
    print(f'shape: {image.shape}')

if __name__ == '__main__':
main()このプログラムでは、まず変数input_pathに画像ファイルのパスを指定しています。その後、cv2.imread()関数を使って画像を読み込み、if image is None:で画像が読み込めなかった場合の例外処理を行っています。
最後に、print()関数を使って画像の情報を表示しています。data:の後には、画像のピクセル値が表示されます。type:の後には、numpy配列であることが表示されます。dtype:の後には、配列の型が表示されます。size:の後には、配列の要素数が表示されます。shape:の後には、配列の形状が表示されます。
このように、Pythonを使って画像の情報を表示することができます。
画像情報の表示
data:
[[[205 205 205]
[204 204 204]
[205 205 205]
…
[204 204 204]
[205 205 205]
[205 205 205]]
…
[[204 204 204]
[204 204 204]
[205 205 205]
…
[204 204 204]
[204 204 204]
[204 204 204]]]
type:
dtype: uint8
size: 3499200
shape: (1080, 1080, 3)
002 画像の読み込み, 画像の表示 … Read and Show the Image
import cv2

def main():

    # 変数の定義
    input_path = "SAMPLE/monkey.png"

    # 画像の読み込み
    image = cv2.imread(input_path)

    # 画像が読み込めなかった場合の例外処理
    if image is None:
        print('Failed to load image')
        return

    # 画像の表示
    cv2.imshow("sample", image)
    cv2.waitKey(0)
    cv2.destroyAllWindows()

if __name__ == '__main__':
main()このPythonプログラムは、OpenCVを使用して画像を読み込み、ウィンドウに表示する方法を示しています。
まず、プログラムでは、必要なOpenCVライブラリをインポートしています。次に、変数input_pathに、読み込む画像ファイルのパスを指定しています。
その後、cv2.imread()関数を使用して、指定されたパスから画像を読み込みます。読み込めなかった場合は、例外処理が実行され、エラーメッセージが表示されます。
最後に、cv2.imshow()関数を使用して、読み込んだ画像をウィンドウに表示します。cv2.waitKey()関数を使用すると、ユーザーが何かキーを入力するまでウィンドウが表示されたままになります。cv2.destroyAllWindows()関数を使用すると、すべてのウィンドウが閉じられます。
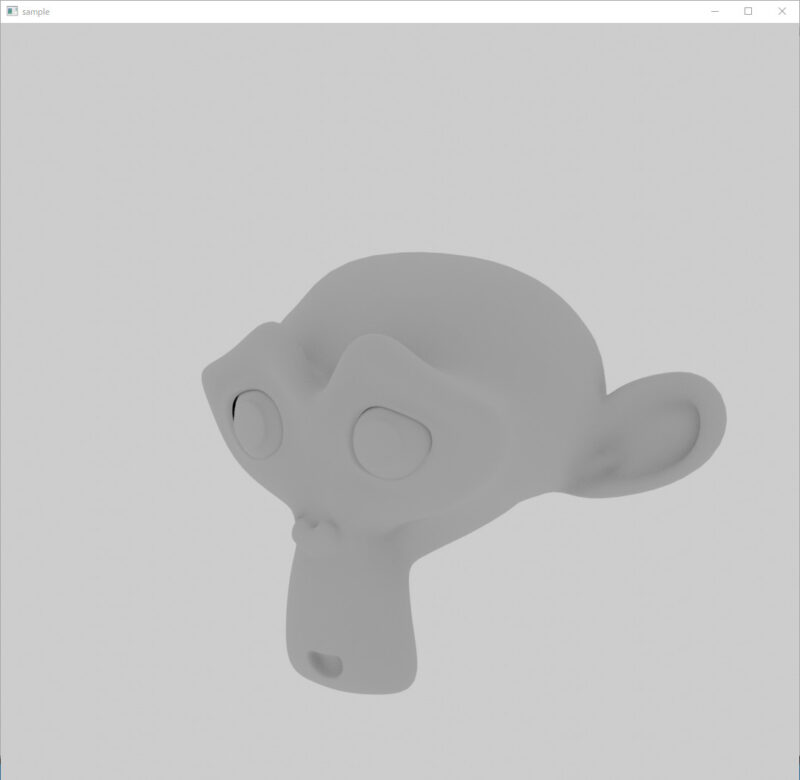
画像の表示
003 画像の読み込み, 画像の書き出し, 画像の保存 … Read and Save the Image
import cv2

def main():

    # 変数の定義
    input_path = "SAMPLE/monkey.png"
    output_path = "SAMPLE/monkeyCopy.png"

    # 画像の読み込み
    image = cv2.imread(input_path)

    # 画像が読み込めなかった場合の例外処理
    if image is None:
        print(f'Failed to load image from {input_path}')
        return

    # 画像の書き出し, 画像の保存
    cv2.imwrite(output_path, image)
    print(f"Saved image to {output_path}")

if __name__ == '__main__':
main()このプログラムは、OpenCVを使用して画像を読み込み、別の場所にコピーするサンプルコードです。
このプログラムは、cv2.imread()関数を使用して、”input_path”で指定された場所の画像を読み込みます。読み込んだ画像は、変数”image”に格納されます。
次に、”image”変数に画像が正しく読み込まれたかどうかを確認するために、if image is None:ステートメントを使用します。画像が読み込めなかった場合、エラーメッセージが出力され、プログラムは終了します。
最後に、cv2.imwrite()関数を使用して、”output_path”で指定された場所に画像を保存します。保存された画像は、変数”image”からコピーされます。
画像の書き出し, 画像の保存
004 データの生成 … Create the Image
import cv2
import numpy as np

def show_save_image(image, window_name, file_name):

    # 画像の表示
    cv2.imshow(window_name, image)
    cv2.waitKey(0)
    cv2.destroyAllWindows()

    # 画像の書き出し, 画像の保存
    cv2.imwrite(file_name, image)

def main():

    # 変数の定義
    output_path_white = "SAMPLE/whiteImage.png"
    output_path_black = "SAMPLE/blackImage.png"
    output_path_blue = "SAMPLE/blueImage.png"
    output_path_green = "SAMPLE/greenImage.png"
    output_path_red = "SAMPLE/redImage.png"

    # 画像となるデータを生成する
    image = np.zeros((400, 400, 3), np.uint8)

    image[:, :] = [255, 255, 255]
    show_save_image(image, 'White Image', output_path_white)

    image[:, :] = [0, 0, 0]
    show_save_image(image, 'Black Image', output_path_black)

    image[:, :] = [255, 0, 0]
    show_save_image(image, 'Blue Image', output_path_blue)

    image[:, :] = [0, 255, 0]
    show_save_image(image, 'Green Image', output_path_green)

    image[:, :] = [0, 0, 255]
    show_save_image(image, 'Red Image', output_path_red)

if __name__ == '__main__':
    main()
005 円の描画 … Draw a Circle on the Image
import cv2
def main():
# 変数の定義
input_path = "SAMPLE/monkey.png"
output_path = "SAMPLE/monkeyWithCircle.png"
# 画像の読み込み
image = cv2.imread(input_path)
# 画像が読み込めなかった場合の例外処理
if image is None:
print(f'Failed to load image from {input_path}')
return
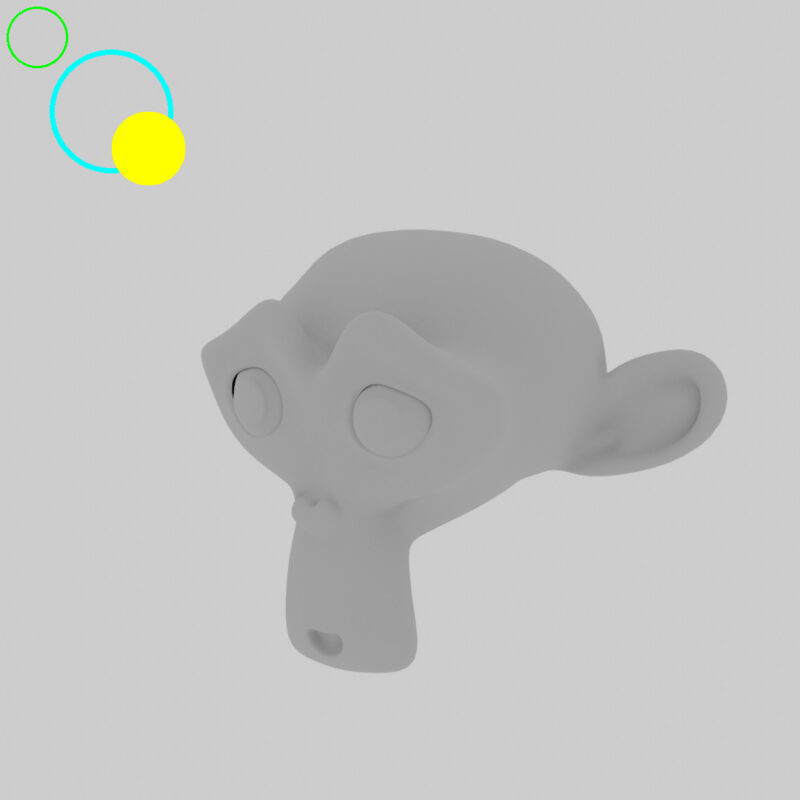
# 画像上に円の描画
cv2.circle(image, (50, 50), 40, (0, 255, 0), 2)
cv2.circle(image, (150, 150), 80, (255, 255, 0), 6)
cv2.circle(image, (200, 200), 50, (0, 255, 255), -1)
# 画像の書き出し, 画像の保存
cv2.imwrite(output_path, image)
print(f"Saved image to {output_path}")
# 画像の表示
cv2.imshow('sample', image)
cv2.waitKey(0)
cv2.destroyAllWindows()
if __name__ == '__main__':
main()画像の書き出し, 画像の保存
006 文字の描画 … Write a Text/Word on the Image
import cv2
def main():
# 変数の定義
input_path = "SAMPLE/monkey.png"
output_path = "SAMPLE/monkeyWithText.png"
# 画像の読み込み
image = cv2.imread(input_path)
# 画像が読み込めなかった場合の例外処理
if image is None:
print(f'Failed to load image from {input_path}')
return
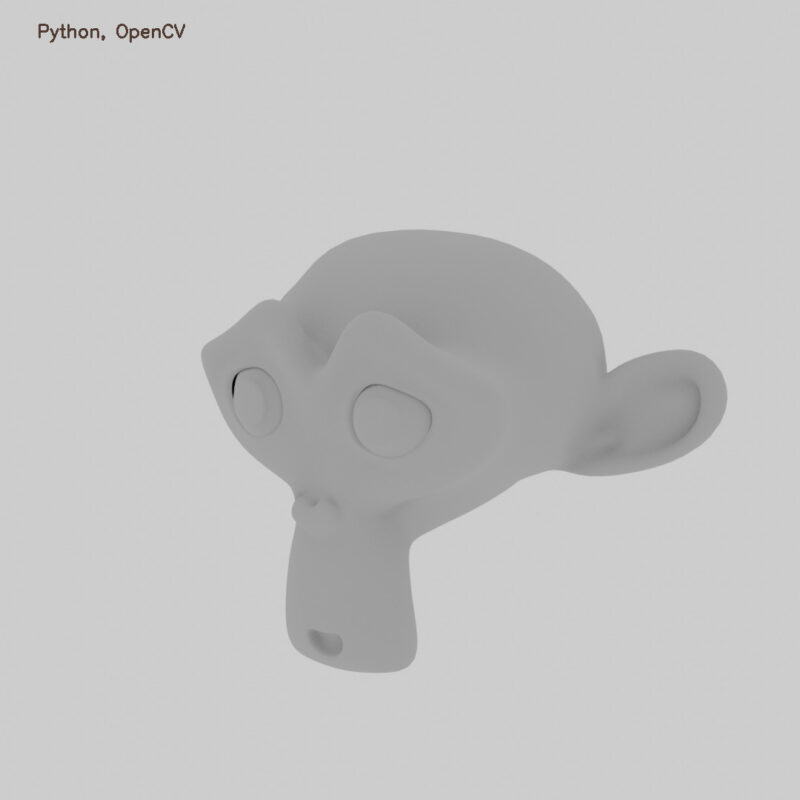
# 画像上に文字の描画
cv2.putText(image, 'Python, OpenCV', (50, 50), cv2.FONT_HERSHEY_SIMPLEX, 0.8, (50, 60, 80), 2)
# 画像の書き出し, 画像の保存
cv2.imwrite(output_path, image)
print(f"Saved image to {output_path}")
# 画像の表示
cv2.imshow('sample', image)
cv2.waitKey(0)
cv2.destroyAllWindows()
if __name__ == '__main__':
main()画像の書き出し, 画像の保存
007 線の描画 … Draw a Line on the Image
import cv2
def main():
# 変数の定義
input_path = "SAMPLE/monkey.png"
output_path = "SAMPLE/monkeyWithLine.png"
# 画像の読み込み
image = cv2.imread(input_path)
# 画像が読み込めなかった場合の例外処理
if image is None:
print(f'Failed to load image from {input_path}')
return
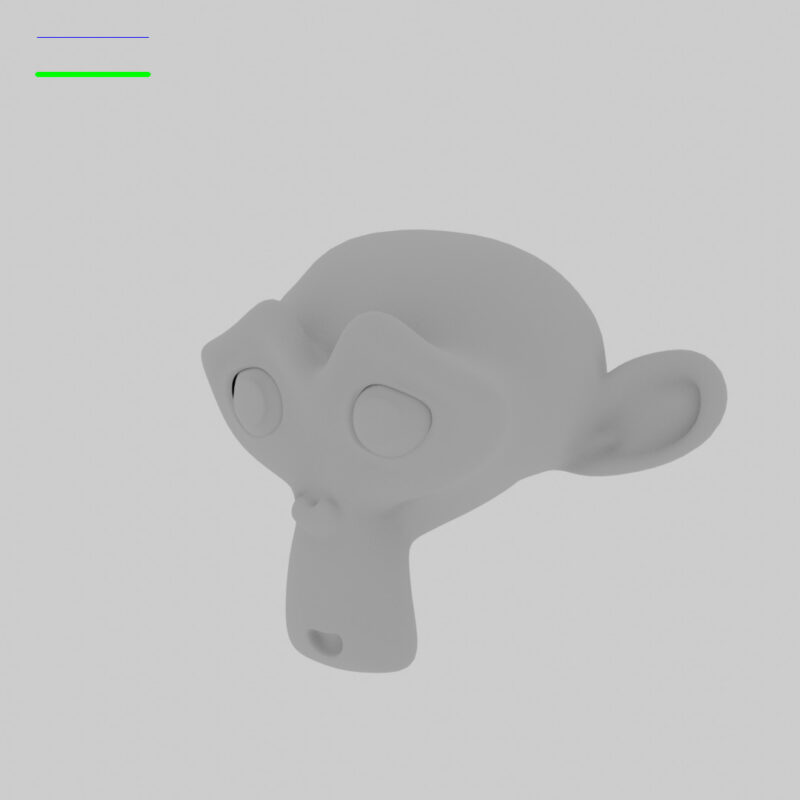
# 画像上に線の描画
cv2.line(image, (50, 50), (200, 50), (255, 0, 0))
cv2.line(image, (50, 100), (200, 100), (0, 255, 0), 5)
# 画像の書き出し, 画像の保存
cv2.imwrite(output_path, image)
print(f"Saved image to {output_path}")
# 画像の表示
cv2.imshow('sample', image)
cv2.waitKey(0)
cv2.destroyAllWindows()
if __name__ == '__main__':
main()画像の書き出し, 画像の保存
008 長方形の描画 … Draw a Rectangle on the Image
import cv2
def main():
# 変数の定義
input_path = "SAMPLE/monkey.png"
output_path = "SAMPLE/monkeyWithRectangle.png"
# 画像の読み込み
image = cv2.imread(input_path)
# 画像が読み込めなかった場合の例外処理
if image is None:
print(f'Failed to load image from {input_path}')
return
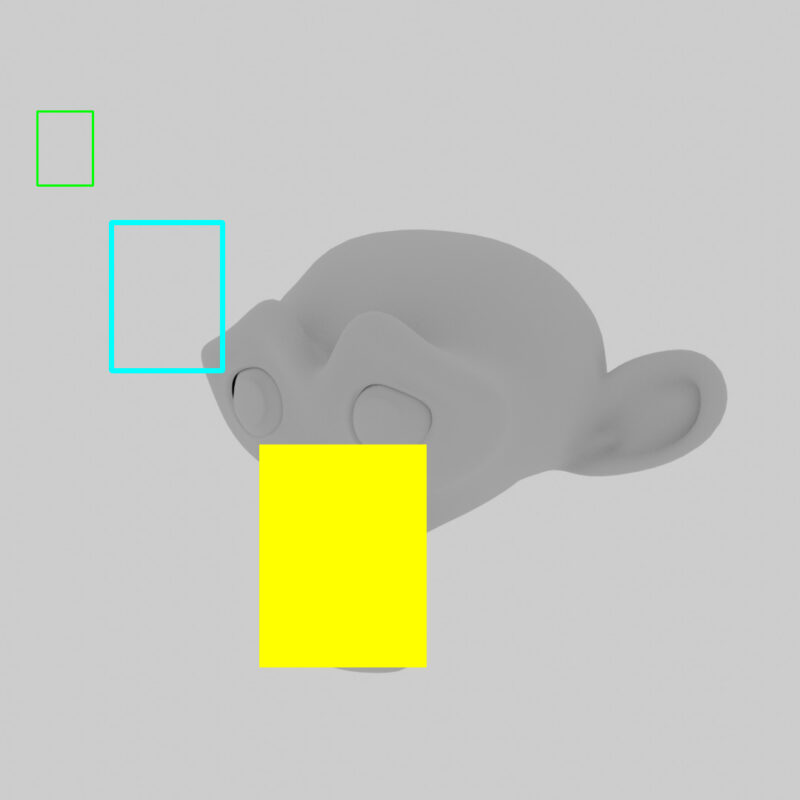
# 画像上に長方形の描画
cv2.rectangle(image,(50, 150),(125, 250),(0, 255, 0),2)
cv2.rectangle(image,(150, 300),(300, 500),(255, 255, 0),6)
cv2.rectangle(image,(350, 600),(575, 900),(0, 255, 255),-1)
# 画像の書き出し, 画像の保存
cv2.imwrite(output_path, image)
print(f"Saved image to {output_path}")
# 画像の表示
cv2.imshow('sample', image)
cv2.waitKey(0)
cv2.destroyAllWindows()
if __name__ == '__main__':
main()画像の書き出し, 画像の保存
009 画像の反転 … Flip the Image
import cv2

def show_save_image(image, window_name, file_name):

    # 画像の表示
    cv2.imshow(window_name, image)
    cv2.waitKey(0)
    cv2.destroyAllWindows()

    # 画像の書き出し, 画像の保存
    cv2.imwrite(file_name, image)

def main():

    # 変数の定義
    input_path = 'SAMPLE/monkey.png'
    output_path_zero = "SAMPLE/monkeyFlipZero.png"
    output_path_pos = "SAMPLE/monkeyFlipPositiveOne.png"
    output_path_neg = "SAMPLE/monkeyFlipNegativeOne.png"

    # 画像の読み込み
    image = cv2.imread(input_path)

    # 画像が読み込めなかった場合の例外処理
    if image is None:
        print(f'Failed to load image from {input_path}')
        return

    # 画像の反転
    new_image = cv2.flip(image, 0)
    show_save_image(new_image,"Flip Zero",output_path_zero)

    new_image = cv2.flip(image, 1)
    show_save_image(new_image,"Flip +1",output_path_pos)

    new_image = cv2.flip(image, -1)
    show_save_image(new_image,"Flip -1",output_path_neg)

if __name__ == '__main__':
    main()
010 画像の拡大/縮小 … Resize the Image
import cv2

def show_save_image(image, window_name, file_name):

    # 画像の表示
    cv2.imshow(window_name, image)
    cv2.waitKey(0)
    cv2.destroyAllWindows()

    # 画像の書き出し, 画像の保存
    cv2.imwrite(file_name, image)

def main():

    # 変数の定義
    input_path = 'SAMPLE/monkey.png'
    output_path_half = "SAMPLE/monkeyResizeHalf.png"
    output_path_double = "SAMPLE/monkeyResizeDouble.png"
    output_path_const = "SAMPLE/monkeyResizeConst.png"

    # 画像の読み込み
    image = cv2.imread(input_path)

    # 画像が読み込めなかった場合の例外処理
    if image is None:
        print(f'Failed to load image from {input_path}')
        return

    # 画像の拡大/縮小/リサイズ
    scale_half, scale_double = 0.5, 2.0
    height, width = image.shape[:2]

    new_image = cv2.resize(image, (int(width * scale_half), int(height * scale_half)))
    show_save_image(new_image, "Resize Half", output_path_half)

    new_image = cv2.resize(image, (int(width * scale_double), int(height * scale_double)))
    show_save_image(new_image, "Resize Double", output_path_double)

    new_image = cv2.resize(image, (400, 200))
    show_save_image(new_image, "Resize 400*200", output_path_const)

if __name__ == '__main__':
    main()
011 画像の回転 … Rotate the Image
import cv2

def show_save_image(image, window_name, file_name):

    # 画像の表示
    cv2.imshow(window_name, image)
    cv2.waitKey(0)
    cv2.destroyAllWindows()

    # 画像の書き出し, 画像の保存
    cv2.imwrite(file_name, image)

def main():

    # 変数の定義
    input_path = 'SAMPLE/monkey.png'
    output_path_rot90 = 'SAMPLE/monkeyRotate90.png'
    output_path_rot270 = 'SAMPLE/monkeyRotate270.png'

    # 画像の読み込み
    image = cv2.imread(input_path)

    # 画像が読み込めなかった場合の例外処理
    if image is None:
        print(f'Failed to load image from {input_path}')
        return

    # 変数の定義
    height, width = image.shape[:2]
    center = (width // 2, height // 2)

    # 画像の回転
    angle, scale = 90.0, 1.0
    affin_transformation = cv2.getRotationMatrix2D(center, angle, scale)
    new_image = cv2.warpAffine(image, affin_transformation, (width, height))
    show_save_image(new_image, "Rotate by 90.0", output_path_rot90)

    # 画像の回転
    angle, scale = 270.0, 2.0
    affin_transformation = cv2.getRotationMatrix2D(center, angle, scale)
    new_image = cv2.warpAffine(image, affin_transformation, (width, height), flags=cv2.INTER_CUBIC)
    show_save_image(new_image, "Rotate by 2700.0", output_path_rot270)

if __name__ == '__main__':
    main()
012 画像の切り抜き/トリミング … Trim the Image
import cv2

def show_save_image(image, window_name, file_name):

    # 画像の表示
    cv2.imshow(window_name, image)
    cv2.waitKey(0)
    cv2.destroyAllWindows()

    # 画像の書き出し, 画像の保存
    cv2.imwrite(file_name, image)

def main():

    # 変数の定義
    input_path = 'SAMPLE/monkey.png'
    output_path_line = 'SAMPLE/monkeyTrimmingLine.png'
    output_path_trim = 'SAMPLE/monkeyTrimmed.png'

    # 画像の読み込み
    image = cv2.imread(input_path)
    original_image = image.copy()

    # 画像が読み込めなかった場合の例外処理
    if image is None:
        print(f'Failed to load image from {input_path}')
        return

    height, width = image.shape[:2]
    center_height, center_width = height//2, width//2
    trim_height, trim_width = height//2, width//2

    # 画像上に長方形の描画
    cv2.rectangle(image,(center_height-trim_height//2, center_width-trim_width//2),(center_height+trim_height//2, center_width+trim_width//2),(0, 255, 0),1)
    show_save_image(image, "Trimming Line", output_path_line)

    # 画像の切り抜き/トリミング
    new_image = original_image[center_height-trim_height//2:center_height+trim_height//2, center_width-trim_width//2:center_width+trim_width//2]
    show_save_image(new_image, "Trimmed Image", output_path_trim)

if __name__ == '__main__':
    main()
013 画像の読み込み(RGB→GRAY)… Read the Image as Gray Scale Image
import cv2

def show_save_image(image, window_name, file_name):

    # 画像の表示
    cv2.imshow(window_name, image)
    cv2.waitKey(0)
    cv2.destroyAllWindows()

    # 画像の書き出し, 画像の保存
    cv2.imwrite(file_name, image)

def main():

    # 変数の定義
    input_path = 'SAMPLE/monkey.png'
    output_path = 'SAMPLE/monkeyReadBGR2GRAY.png'

    # 画像の読み込み
    image = cv2.imread(input_path, cv2.COLOR_BGR2GRAY)

    # 画像が読み込めなかった場合の例外処理
    if image is None:
        print(f'Failed to load image from {input_path}')
        return

    show_save_image(image, "Gray Image", output_path)

if __name__ == '__main__':
    main()
014 画像の色変換(RGB→GRAY)… Convert the Image to Gray Scale Image
import cv2

def show_save_image(image, window_name, file_name):

    # 画像の表示
    cv2.imshow(window_name, image)
    cv2.waitKey(0)
    cv2.destroyAllWindows()

    # 画像の書き出し, 画像の保存
    cv2.imwrite(file_name, image)

def main():

    # 変数の定義
    input_path = 'SAMPLE/monkey.png'
    output_path = 'SAMPLE/monkeyConvertBGR2GRAY.png'

    # 画像の読み込み
    image = cv2.imread(input_path)

    # 画像が読み込めなかった場合の例外処理
    if image is None:
        print(f'Failed to load image from {input_path}')
        return

    # 画像の色変換
    image_gray = cv2.cvtColor(image, cv2.COLOR_BGR2GRAY)
    show_save_image(image_gray, "Gray Image", output_path)

if __name__ == '__main__':
    main()
015 カラー画像の分離(R/G/B)… Split the Color Image by R/G/B
import cv2

def show_save_image(image, window_name, file_name):

    # 画像の表示
    cv2.imshow(window_name, image)
    cv2.waitKey(0)
    cv2.destroyAllWindows()

    # 画像の書き出し, 画像の保存
    cv2.imwrite(file_name, image)

def main():

    # 変数の定義
    input_path = 'SAMPLE/monkey.png'
    output_path_blue = 'SAMPLE/monkeyBlue.png'
    output_path_green = 'SAMPLE/monkeyGreen.png'
    output_path_red = 'SAMPLE/monkeyRed.png'

    # 画像の読み込み
    image = cv2.imread(input_path)

    # 画像が読み込めなかった場合の例外処理
    if image is None:
        print(f'Failed to load image from {input_path}')
        return

    blue_image, green_image, red_image = cv2.split(image)

    show_save_image(blue_image, "Blue", output_path_blue)
    show_save_image(green_image, "Green", output_path_green)
    show_save_image(red_image, "Red", output_path_red)

if __name__ == '__main__':
main()このプログラムは、OpenCVを使用して画像から青、緑、赤のチャンネルを分離して、それぞれのチャンネルを単独で表示および保存する方法を示しています。
プログラムは、cv2モジュールをインポートし、show_save_imageという関数を定義します。この関数は、画像を表示し、保存するために使用されます。次に、main関数が定義され、それは次の手順を実行します。
- 変数input_pathに入力画像のパスを定義します。
- 変数output_path_blue、output_path_green、output_path_redにそれぞれ青、緑、赤のチャンネルを保存するための出力画像のパスを定義します。
- cv2.imread関数を使用して、画像をinput_pathから読み込みます。
- 読み込んだ画像がNoneである場合、例外処理に入ります。
- cv2.split関数を使用して、画像を青、緑、赤のチャンネルに分離します。
- show_save_image関数を使用して、各チャンネルを表示し、保存します。それぞれのチャンネルのウィンドウ名とファイル名が指定されます。
このプログラムを実行すると、元の画像から青、緑、赤のチャンネルが分離され、それぞれが単独で表示および保存されます。
参考リンク … Reference Link