こちらは「pytorch3d」(Pythonライブラリ)のサンプルコードについての記事となっております。
その他、3Dモデルの処理方法についての情報は下記の記事で紹介しております。
open3d/plotly/trimesh/pyvista/vedo/pytorch3d/matplotlibといったPythonライブラリや3DツールのPythonAPIであるbpy(Blender)/unreal(Unreal Engine)といったPythonライブラリについて気になる方はこちらの記事をご覧ください。
目次
基本情報 … Basic Information
「pytorch3d」は、PyTorchをベースとした3Dディープラーニングライブラリです。3Dデータのロード、前処理、データ拡張、ネットワークの構築、トレーニング、評価などのためのツールが提供されています。
具体的には、点群、三角形メッシュ、ボクセルグリッドなどの3Dデータフォーマットのロードや生成、3Dオブジェクトの変換、レンダリング、テクスチャリングなどを行う機能が含まれています。また、PointNet、Mesh R-CNN、AtlasNetなどの3Dディープラーニングアルゴリズムの実装も提供されています。
サンプルコード … Sample Code
001 モデルの読み込み, モデルの表示 … Read the Model, Show the Model
1.「pytorch3d」(Pythonライブラリ)で「OBJ」ファイルを読み込む
2.「pytorch3d」(Pythonライブラリ)で「OBJ」モデルを表示する
### Public Library ############################################################

import torch

from pytorch3d.io import load_obj, save_obj
from pytorch3d.structures import Meshes
from pytorch3d.ops import sample_points_from_meshes

import matplotlib.pyplot as plt
from mpl_toolkits.mplot3d import Axes3D

###############################################################################

if torch.cuda.is_available():
    device = torch.device("cuda:0")
else:
    device = torch.device("cpu")
    print("WARNING: CPU only, this will be slow!")

###############################################################################

verts, faces, aux = load_obj('SAMPLE/monkey.obj')

print(verts)
### tensor([[ 0.4375,  0.1641,  0.7656],
###         [-0.4375,  0.1641,  0.7656],
###         [ 0.5000,  0.0938,  0.6875],
###         ...,
###         [-0.7891, -0.1250, -0.3281],
###         [ 0.8594,  0.3828, -0.3828],
###         [-0.8594,  0.3828, -0.3828]])

print(faces.verts_idx)
### tensor([[ 46,   0,   2],
###         [ 46,   2,  44],
###         [  3,   1,  47],
###         ...,
###         [319, 503, 389],
###         [504, 322, 320],
###         [504, 320, 390]])

print(faces.normals_idx)
### tensor([[  0,   0,   0],
###         [  0,   0,   0],
###         [  1,   1,   1],
###         ...,
###         [497, 497, 497],
###         [498, 498, 498],
###         [498, 498, 498]])

print(faces.textures_idx)
### tensor([[  0,   1,   2],
###         [  0,   2,   3],
###         [  4,   5,   6],
###         ...,
###         [457, 529, 436],
###         [531, 555, 459],
###         [531, 459, 438]])

print(faces.materials_idx)
### tensor([0, 0, 0, ..., 0, 0, 0])

print(aux.normals)
### tensor([[ 0.6650, -0.2008,  0.7194],
###         [-0.6650, -0.2008,  0.7194],
###         [ 0.8294, -0.3036,  0.4689],
###         ...,
###         [-0.5428, -0.2063, -0.8142],
###         [-0.2474, -0.9231, -0.2945],
###         [ 0.2474, -0.9231, -0.2945]])

print(aux.verts_uvs)
### tensor([[0.8910, 0.5901],
###         [0.8706, 0.5896],
###         [0.8601, 0.5601],
###         ...,
###         [0.6204, 0.5657],
###         [0.4981, 0.5523],
###         [0.2642, 0.5501]])

print(aux.material_colors)
### {'None': {'shininess': tensor([500.]),
###         'ambient_color': tensor([0.8000, 0.8000, 0.8000]),
###         'diffuse_color': tensor([0.8000, 0.8000, 0.8000]),
###         'specular_color': tensor([0.8000, 0.8000, 0.8000])
###         }}

###############################################################################

faces_idx = faces.verts_idx.to(device)
verts     = verts.to(device)

sample_mesh = Meshes(verts=[verts], faces=[faces_idx])

def plot_pointcloud(mesh, title=""):
    # Sample points uniformly from the surface of the mesh.
    points = sample_points_from_meshes(mesh, 5000)
    x, y, z = points.clone().detach().cpu().squeeze().unbind(1)
    fig = plt.figure(figsize=(8, 8))
    ax = Axes3D(fig)
    ax.scatter3D(x, y, -z)
    ax.set_xlabel('x')
    ax.set_ylabel('z')
    ax.set_zlabel('y')
    ax.set_title(title)
    ax.view_init(20, -160, "y")
    plt.show()

plot_pointcloud(sample_mesh, "monkey.obj")

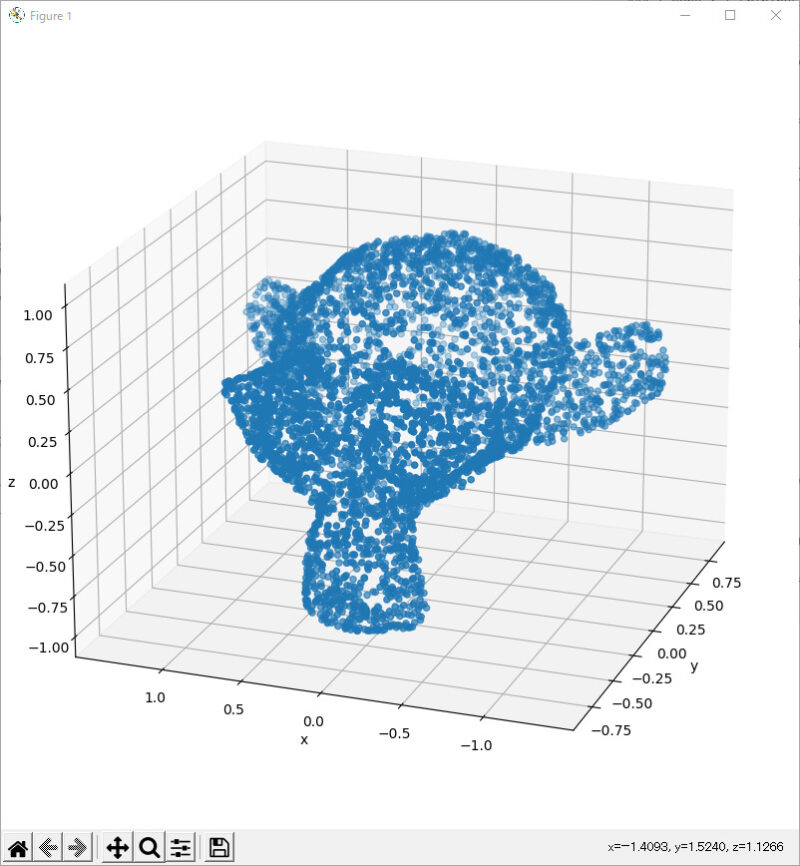
###############################################################################このプログラムは、PyTorch3D を使用して、3D メッシュからサンプリングされた点群を可視化する方法を示しています。
まず、import 文で必要なライブラリをインポートします。次に、load_obj 関数を使用して、OBJ ファイルからメッシュを読み込みます。読み込まれたメッシュは、verts、faces、aux の3つの変数に格納されます。verts は頂点の座標、faces は三角形の頂点のインデックス、aux は法線、テクスチャ座標、マテリアル情報などの補助データを含みます。
次に、読み込んだメッシュから PyTorch3D の Meshes オブジェクトを作成し、sample_points_from_meshes 関数を使用して、メッシュから一様に点をサンプリングします。最後に、Matplotlib を使用して点群を可視化します。
サンプル出力画像1

参考リンク … Reference Link


